
Rhorawill 4-Pack Solar Panel for Blink Outdoor Cameras: Convenient, Continuous Power for Your System
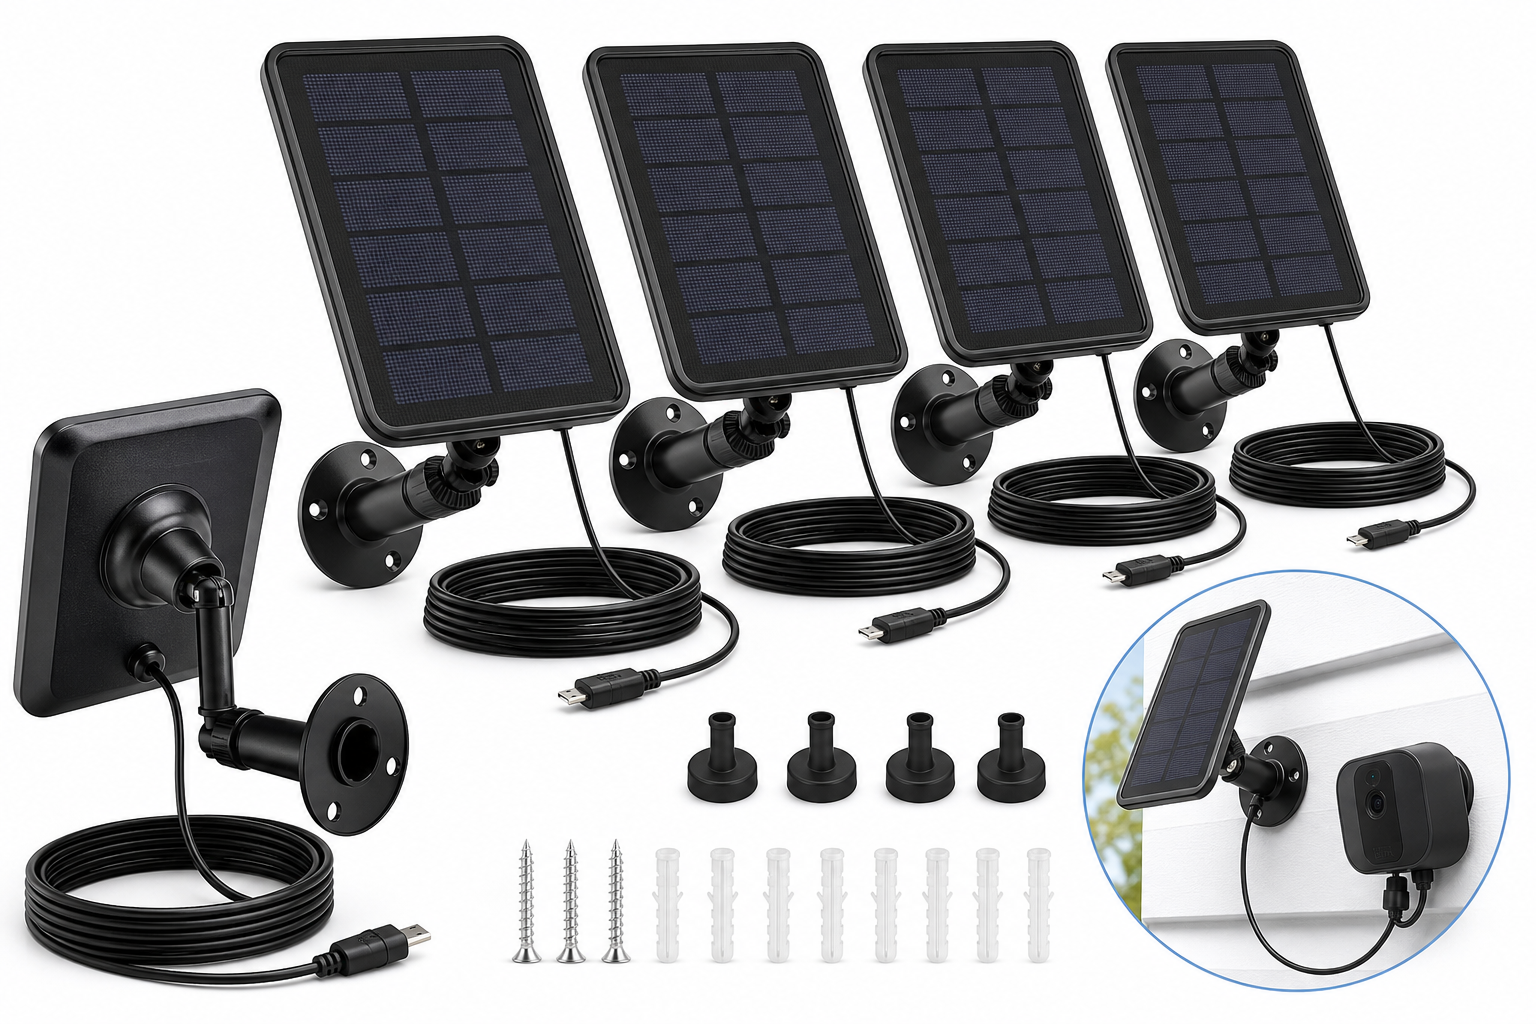
The Rhorawill 4 Pack Solar Panel for Blink Outdoor and XT-series cameras is designed to provide continuous, low-maintenance power to multiple Blink devices at once. Compatible with Blink Outdoor 2K+, Outdoor 4 (4th Gen), Outdoor 3 (3rd Gen), XT3, XT2, and XT cameras, this kit includes four solar panels, adjustable mounts, long 13.1 ft cables, and rubber plugs to help protect the power connection. This review examines how easy the system is to set up, how it performs in day-to-day use, where it works best, and some limitations users should be aware of before relying on it as their primary power solution.
Introduction
Battery-powered security cameras are convenient, but frequent battery changes quickly become tedious and expensive—especially if your cameras are mounted high or in hard-to-reach locations. The Rhorawill 4 Pack Solar Panel for Blink Outdoor 2K+, Outdoor 4 (4th Gen), Outdoor 3 (3rd Gen), XT3, XT2, and XT cameras aims to solve that problem by keeping your cameras powered via sunlight instead of disposable lithium AAs.
Sold as a four-panel bundle at around $65.99, this kit is clearly targeted at users running several Blink cameras around the home who want to cut down on maintenance. Each panel includes an adjustable mount, a long 13.1 ft (4 m) power cable, and a rubber plug designed to create a more weather-resistant connection to the camera.
This review walks through setup, daily usage, performance in different conditions, and where the Rhorawill solar panels shine—as well as some areas that could be improved.
Setup / Getting Started
Compatibility and what’s in the box
This Rhorawill kit is built specifically for:
- Blink Outdoor 2K+
- Blink Outdoor 4 (4th Gen)
- Blink Outdoor (3rd Gen)
- Blink XT3
- Blink XT2
- Blink XT
Cameras are not included—the panels are purely a power accessory. The package typically includes:
- 4× solar panels
- 4× adjustable mounting brackets
- 4× 13.1 ft power cables
- 4× rubber plugs or grommets to help seal the power port
- Mounting hardware (screws and wall anchors)
Before installation, it’s important to confirm that your mounting locations get several hours of direct sun per day, ideally during peak sun (late morning through mid‑afternoon). Panels placed in constant shade, under overhangs, or behind glass will be much less effective.
Physical installation
Mounting is straightforward but may take some planning:
-
Select a mounting location for each panel with:
- Clear southern exposure (in the northern hemisphere) or maximum direct sunlight
- Minimal shading from trees, roofs, or neighboring buildings
- A cable route that can reach the camera using the 13.1 ft lead
-
Attach the mounting bracket where you want the panel, using the included screws and wall anchors as needed.
-
Mount and angle the panel toward the sun. The bracket allows tilt and swivel adjustment, so you can fine‑tune the angle after initial installation.
-
Route the cable from the panel to the camera:
- Follow trim lines, eaves, or siding gaps to keep the cable tidy
- Use cable clips or zip ties (not always included) for a neater, more secure run
-
Connect to the camera:
- Insert the connector fully into the camera’s power port
- Seat the supplied rubber plug snugly around the connection to help keep out moisture and dust
- On some Blink mounts, you may need to adjust how the cable exits the camera so that the mount doesn’t pinch it
Initial configuration
Most Blink cameras automatically switch to external power when a USB source is detected. Things to consider during setup:
- Remove internal batteries if the manufacturer or solar panel instructions recommend relying solely on external power, especially to avoid corrosion or confusion about which power source is in use.
- Check the app status to confirm the camera is online and responding to live views and motion events once connected.
- If your firmware supports it, look for any indication that external power is active. On some Blink versions, this may not be clearly indicated, so you may have to judge based on whether battery levels stop decreasing.
Once installed, there’s typically nothing else to configure on the panel itself—it passively provides power whenever it has enough solar input and sufficient charge in its internal circuitry (if applicable).
Daily Usage
Hands-off operation
In day-to-day use, the Rhorawill solar panels are intended to be largely invisible. After the initial positioning and cable routing, you should rarely need to interact with them. The hoped-for experience is:
- No more climbing ladders every couple of months to swap AA lithium batteries
- Consistent camera uptime, especially in areas with good sunlight
- Ability to increase motion sensitivity or clip length without worrying as much about battery drain (subject to the limits of the panel’s output and your local weather)
Users who place panels in consistently sunny spots often find that their cameras stay powered for long stretches without intervention. However, in marginal conditions—deep shade, very short winter days, or extremely high activity zones—occasional manual checks are still advisable.
Cable length and camera placement flexibility
The 13.1 ft cable is a key advantage of this kit over many all‑in‑one solar mounts. It allows you to:
- Mount the camera where it has the best view of your entryway, driveway, or yard
- Mount the panel separately where it has the best access to sunlight
This flexibility is especially helpful for cameras placed under eaves or on porches, where direct sunlight might be blocked for much of the day. You can run the cable up to a sunnier section of roofline or wall while keeping your camera in the optimal viewing position.
Weather and seasonal considerations
In use, performance and user experience depend heavily on climate and season:
- Sunny climates (e.g., much of the southern U.S.) tend to provide more than enough solar energy for typical home activity levels.
- Cloudy or high-latitude regions may see reduced charging, especially in winter when days are short and the sun angle is low.
- Dust, pollen, and snow accumulating on the panel surface can reduce efficiency. A periodic wipe with a soft cloth can help maintain performance.
Some users report that solar panels work well in summer but struggle to keep up in winter if the camera is in a busy area generating hundreds of motion clips per day. In those scenarios, you may still need to occasionally check on camera uptime or temporarily dial back aggressive recording settings.
Performance & Reliability
Power delivery in typical conditions
Under good sunlight, the Rhorawill solar panels are capable of supporting continuous operation of compatible Blink cameras for most home security use cases, including:
- Standard motion detection schedules
- Short‑to‑moderate clip lengths
- Periodic live views
With multiple hours of direct sun per day, the panels can usually offset daily energy consumption and maintain sufficient power. For low‑traffic locations—such as backyard corners or side yards—this can effectively eliminate routine battery swaps.
High‑activity or challenging locations
Performance may be less consistent in:
- High‑traffic zones (front doors facing busy streets, driveways in large complexes)
- Heavily shaded spots where sunlight is intermittent or blocked for most of the day
In those scenarios, the panels might:
- Keep the camera running most of the time but occasionally fall behind on days with poor weather
- Require careful aim and placement to maximize the solar window each day
Depending on how often your cameras trigger, you may still want to:
- Periodically verify that cameras remain responsive
- Adjust clip lengths, retrigger times, and motion zones to balance coverage and power usage
Reliability and build quality
From a construction standpoint, the Rhorawill panels present as typical for third‑party camera solar accessories:
- Rigid panel surface designed for outdoor use
- Adjustable mounting arm with simple screw‑based tilt and swivel
- Weather‑resistant cable with molded connectors
- Rubber plug/grommet to help seal the camera’s power port
In practice:
- Users who position panels correctly and keep connections dry commonly report stable operation over months.
- Inadequate weather sealing, loose mounts, or stressed cables (e.g., bent sharply at the connector) can lead to intermittent power or premature failure over time.
While long‑term durability will vary by environment, the overall design is in line with what is typical in this category.
What Works Well
-
Broad Blink compatibility
Supporting Blink Outdoor 2K+, 4th Gen, 3rd Gen, XT3, XT2, and XT cameras makes this kit useful for households with mixed generations of Blink devices. -
Four-pack value for multi‑camera homes
If you have three or four outdoor Blink cameras, buying a 4‑pack at around $65.99 is generally more cost‑effective than purchasing individual panels, while also giving you a uniform setup. -
Generous 13.1 ft cable
The long cable opens up more options for locating panels in full sun while placing cameras where they’re most effective for surveillance. -
Reduced battery waste and maintenance
By relying on solar power, you can significantly cut back on lithium AA usage, saving both money and time spent climbing ladders to replace batteries. -
Straightforward installation
Mounting hardware is simple, and the overall process is approachable for most DIY users with basic tools. -
Cleaner, continuous power
For users who stream live views more often or increase their clip lengths, external power via solar can provide more headroom than batteries alone, within the limits of the sun exposure.
What Could Be Improved
-
Dependence on strong sunlight
As with any small solar solution, performance drops sharply with shade, northern exposures, or persistent cloud cover. Clearer guidance or placement templates could help users avoid under‑performing locations. -
Limited feedback on power status
Blink’s own app provides only basic information about power and battery status, and some firmware versions do not clearly show when external power is active. That can make it harder to know whether the panel is fully keeping up with camera demand, especially in marginal conditions. -
Cable and connector strain relief
The included rubber plug helps seal the connection, but care is needed to prevent the cable from being bent sharply or pulled over time. A more robust strain‑relief design at the camera end would improve long‑term reliability. -
Mounting hardware flexibility
The standard bracket works fine for flat surfaces, but users mounting to unconventional spots (fence posts, gutters, or irregular masonry) may find themselves purchasing additional hardware or adapters. -
Expectations around very high activity
In extremely busy environments (hundreds of clips per day), a small panel like this may struggle to keep up, especially in winter. Clearer guidance on recommended usage limits or example scenarios could help set more realistic expectations.
Overall Impression
The Rhorawill 4 Pack Solar Panel for Blink Outdoor 2K+/4 (4th Gen)/(3rd Gen), XT3, XT2, and XT cameras is a practical and cost‑effective way to reduce battery changes and keep multiple Blink cameras running with far less hands‑on maintenance.
Its biggest strengths are:
- Wide compatibility across several Blink generations
- The value of a four‑panel bundle for multi‑camera setups
- Long 13.1 ft cables that allow independent placement of panel and camera
- Straightforward DIY installation
However, like all compact solar solutions, real‑world success depends heavily on installation quality and available sunlight. Users with cameras placed in shade or in extremely high‑activity zones may still encounter power limitations, especially in winter or consistently overcast climates.
If your Blink cameras have reasonable sun exposure for at least a few hours each day, and you’re looking to reduce the cost and hassle of frequent battery changes, the Rhorawill 4‑pack is a solid accessory to consider at around $65.99. It won’t eliminate every power concern in every scenario, but for typical residential use it can provide a more “set it and forget it” experience than relying solely on disposable batteries.